Thursday, February 28, 2013

DIY Headboard and Bed Make-Over


The bed in Max's room at the moment is uggg-lllly. It's functional and actually used to be Sean's bed when he was (a lot) younger, but there is absolutely nothing attractive about it... For ages now I've been planning on making it over, the Pinterest Challenge was just the kick in the butt I needed to get it done.


I ambitiously gave myself a day to do the make-over and even thought to myself 'I might whip up a new doona for the bed if I have time'. Ummm no... It took me two days to get the whole thing done, but now that's it's finished I'm so glad I finally tackled it!

Here's what I started with...


A king single ensemble. Like I said, functional but not exactly stylin'.

I split the project into two parts. First up I covered the base of the ensemble and added legs, then I made a headboard. I got my inspiration from these three pins below.

{source}

{source}
{source}
Materials:
  • linen
  • cheap white poplin 
  • batting
  • 2inch thick foam
  • mdf board
  • button covering kit
  • furniture legs


Tools
  • screwdriver
  • drill bit
  • staple gun and staples
  • embroidery needle
  • embroidery thread
  • nails
  • plyers
  • hammer

I started out by covering the base of the ensemble with my cheap poplin, which I used because I didn't want that bright pattern showing through the loose weave of my linen. I pinned each strip in place and then went around with my staple gun to secure it to the underside and top of the base.


I then did the same thing with with the linen, only I paid a bit more attention to the detail and made sure the corners looked neat and tidy.

As I was going around securing the linen I noticed the staples weren't holding the fabric to the top side of the base. Underneath was fine because the staples went straight into plywood, but on top they were only going into fabric which meant they came out really easily. I ended up using nails for the top because they went through the fabric and back down into the ply. In other words I made things up as I went and wished for the best!!


Once that was all done I attached the legs and moved on to the headboard.


I measured up Max's bed before hitting up Bunnings and decided that I wanted my mdf to be 1100 x 1100 and got them to cut it in store for me. Lucky I did, there is no way I would have fit anything bigger into the back of my car :).

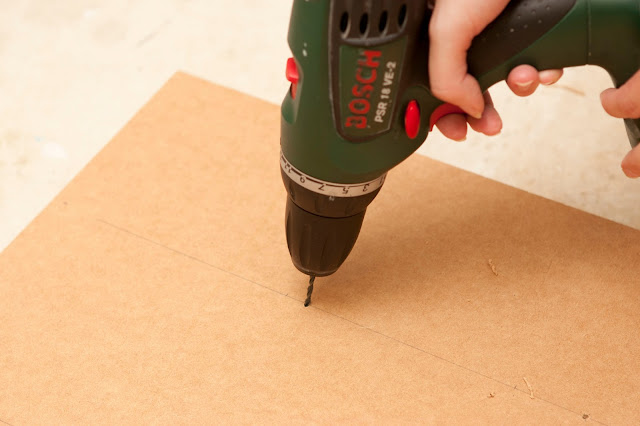
To start off the headboard I measured out where I wanted my buttons and then drilled holes through the mdf (gorgeous hand model used as I was behind the camera, thanks J!!).


    I though about using spray adhesive to stick the foam to the board, but ended up using fabric glue. It was raining outside and the house was full of people so I didn't want to fume up the place. No biggie though the fabric glue worked just fine.


    Then it was just a matter of covering the board and foam with batting, then my el-cheapo lining and finally my linen (I used the poplin underneath the linen again because I didn't want the batting poking through the weave of the fabric).


    Then came the most time consuming and difficult part. Covering the buttons and sewing them onto the headboard to get that tufted look that I love so much! Soooo much harder than I expected, but so definitely worth it!

    Covering the buttons was just a matter of following the instructions on the packet, attaching them was a whole other ball game... After a fair bit of trial and error I worked out the best way to do it.

    I threaded the needle with embroidery thread and then tied it into a loop. Then I tied it onto the button. I didn't take a photo, but if you can picture the needle with a decent amount of thick thread on it and then a button tied onto the very end of the thread.

    To get the buttons in the right place I pushed a nail through the pre-drilled holes in the back of the board, felt where the point of the nail touched my fabric and then pushed my needle and thread (with the button attached) up through the the fabric, batting and foam etc until it came out the back of the board. With one hand pushing my needle through, and pliers in the other hand I grabbed onto the needle and pulled it right the way through. Then I would tie a big knot in the thread, pull it as tight as possible and secure it with staples.


    That probably made no sense what-so-ever... If you want to give this a go and have no idea what I'm on about email me and I'll try and explain it better :)

    I'm sooooooo happy with how it turned out and Max absolutely loves it! He knows it's the same bed, but he still likes to call it his 'new bed' and he's so excited to go to bed in it tonight. The real test will be whether or not he stays in there the whole night I guess!


    Phew, now that I finally have it finished I'm linking up with Katie, Sherry, Megan and Michelle (and checking out all of the amazing projects that have been shared).

    Thanks for reading!!


    {If you would like to see any of my previous pinterest challenge projects you can see them below}

    {link}
    {link}
    {link}
    {link}
    {link}

    Saturday, February 23, 2013

    It's That Time Again

    Any of you that have been reading for a while will know that my all time favourite 'blog thing' is the Pinterest Challenge. I look forward to it so much! It's the perfect kick in the pants every three months or so to actually get started on those big projects that I tend to put off.

    Max's bed is one of those projects I've been putting off. At the moment it's just a plain ensemble, I can't wait to show you how I make it over next Wednesday!

    I have big plans for Max's room (huge plans!!), but all I've done so far is make him a tee-pee (which is shown in his old nursery in the photo), and built shelving in his wardrobe.


    So much that still needs to be done!!

    If you want to see some of the things that are inspiring you can have a look at pinboard here.


    I hope you all have a great weekend!!


    Thursday, February 21, 2013

    7/52


    On the weekend Sean set Lincoln's cot up in our bedroom and he slept in there for the first time on Sunday night. Seems like it was the perfect time to move him into it, because just last night he started rolling over. Neither of us has seen him do it yet, but we would find him on his tummy sound asleep. Smartie pants!!

    Last week was also the week that I finally got a double pram. I've been wanting one since before Link was born, but could not convince Sean to spend over $700 on one. I got this one from a school friend for an absolute bargain, plus it's in incredible condition because they barely ever used it. Max absolutely loves it and will happily sit up the front. Makes shopping, posting off orders and going for walks so much easier!

    Over the weekend I also headed down the coast to visit my Mum. She normally comes up to my place so it's been ages since I last went down there. The boys were on their best behaviour and we had such a good time. Mum and I bought some fabric and recovered her dining room chairs while I was there. I loved the fabric she chose so much that I bought some for myself in a blue/grey. My sister and I are planning on swapping dining room tables and I want to recover the chairs before I give it to her. I'm hoping I'll have enough fabric left over to cover a few boxes as well. I'll keep you posted on how that goes :)

    I hope you're all having a great week!
     

    Wednesday, February 20, 2013

    The Block Shop


    For those of you that don't live here in Australia, The Block is a reality TV renovating show. It just happens to be my all time favourite thing to watch on television. So you can imagine how incredibly excited I am to be part of their online store!!

    The items they've chosen (from my Down That Little Lane store front) are the gold 'love' cushion and my love heart art.

    {See it here}

    {See it here}
    I don't think any of my items have been used in this series of The Block (seeing as it's already finished filming and all), but there's always hope for the next season later in the year!

    If you want to check out more from my store you can see it all here at Down That Little Lane (all items are available for international shipping).


    Sunday, February 10, 2013

    6/52


    "A portrait of my boys, once a week, every week, in 2013"

    Max is so full of character and energy and imagination. This is him giving me his 'angry bird face'. Love him!

    Lincoln is absolutely loving this play mat. We pulled it out last week and he loves to bat at the toys and kick his legs in the air. Such a joy to watch him learn and grow :).

    (Linking up with Che & Fidel).


    Saturday, February 9, 2013

    Love Bug Valentine and Free Printable

    One of my pet names for Max is 'my little love bug' so the other day when I saw this pin I knew it would be the perfect little Valentine for him (and for Sean too).


    I was right they both loved them! Well Max loved most of it, he loved seeing his love bug and he loved the marshmallow head, but when he ate the mint choc biscuit he declared 'it tastes like toothpaste!', then asked me to wash his mouth out! Whoops, looks like he's inherited my dislike for mint flavoured things. Max wasn't too traumatized though, he asked for another one the next day and this time just ate everything except this biscuit :).

    To make these I read the tutorial from House of Joyful Noise, but switched it up a pinch to include marshmallows (they're Sean and Max's faves).

    I used:
     - Mint Slice Biscuits
     - Choc Mallow Bites
     - Choc Fudge Writing Icing (in the little tube)
     - Silver Cachous
     - Love Heart Sprinkles
     - White Chocolate Fondant (tinted rose pink)

    Putting them together was super, super simple. I used a little of the choc fudge icing to stick the mallow to the biscuit. To do this I just squeezed on a little icing then pushed them together until the mallow gave way to the shape of the biscuit, then popped it into the freezer for five minutes to set.

    I cut some circles out of the pink fondant and cut them in half to make the wings. I stuck them down with a little bit more of the fudge icing.

    Then it was just a matter of pushing some love hearts into the icing wings and sticking on cachous for eyes with a bit more of the fudge icing.

    So simple and so very sweet!

    And... because I love you all, my little Valentine gift for you is a free printable that you can use to make some of these for your own love bugs.

    Just click the link below to download it (you'll need the latest version of adobe, which you can download for free here).


    I hope you all have a great weekend!


    Tuesday, February 5, 2013

    Valentine's Day Chalkboard

    Confession time, I've never decorated for Valentine's Day before. Shocking I know!  ;)

    This year I decided to put in a pinch more effort and at least switch up my chalkboard to something a little bit romantic.


    I've seen this Beetle's quote floating around pinterest for the last month or so, and then when I saw this desktop background I knew exactly what I wanted on my board.

    Seeing as it was a nice and simple design I free-handed it. I just pulled my board down off the wall, worked with it flat on the beach and used a chalk pen. It's not perfect, but it's definitely good enough for me!


    There are heaps of great tutorials out there if you're looking to do something a little more elaborate on your chalkboard. This one from Ella Clare shows you how to use grids to create your masterpiece and My Sweet Savannah has a great post about how she traces hers.

    Tell me, are you planning on decorating for Valentine's Day or do you stick to the main holidays?